Friday, December 28, 2007

Technique – Kris Korzeniowski

Technique – Kris Korzeniowski
By Kris Korzeniowski
From http://tcw2.ppsw.rug.nl/~gyas/wedstrijd/artikelen/techniek.shtml
Translated from Dutch by Jamie Croly
-----------------

INTRODUCTION

Athlete’s technical capacity, condition and motivation determine the level of their performance. Although technique plays a role at all sports, rowing demands a considerable technical quality before a high performance level can be reached. It makes no sense to train for strength, endurance and other physiological aspects if a rower does not have the skills to use these for increasing the boat speed.

Frequently smaller and weaker athletes can compete with stronger and bigger athletes because they are technically better.

Coaches must concentrate on the basic principles of the rowing technique. By continuing to focus on the basic principles you can both begin and progress athletes development. A lot of experience and successful coaches have simplified their coaching of technique over the course of years.

As coach you must understand the basic principles of the rowing technique entirely and master this. You must have a clear picture of the rowing stroke and be to describe this in simple, terms clear to your rowers.

Natural rowing
The technique which is presented here is a logical, natural movement. There is no place for abrupt movements which disrupt the speed of the boat. Body movement, hendelvoering and drive must be in agreement with the speed of the boat.

At the beginning of the stroke the rower must place the spoon in the water, at the same time as the legs push against the stretcher. The upper body and the arms only give support: you hang on the oar whereas the legs are kicked off. At the end of the leg drive the upper body sways to the back, followed by fast bend of the arms. The legs, upper body and arms cooperate in a logical and natural order, each partially overlapping. Because of this a constant pressure is provided on the spoon.

If the rowers can maintain the idea of hanging, it will be not necessary them tell when to ' open the back ' or the arms to bend. Hanging on the oar dictates the natural movement order.

Another main point is that all movements are dependent on each other and in harmony is with the speed of the boat. This way the complete stroke cycle - irrespective of the tempo - seem simple, fluently and easy. Movements that are not fluid makes for wrong movements - abrupt accelerations, jerky movements – and are more clearly visible.

Phases of the Rowing Stroke
Rowing is a cyclic sport; rowers repeat the same order of movements each time. If we talk about the rowing stroke we also talk about the stroke cycle.

The stroke cycle consists of 2 phases:
The propulsive phase - drive - the spoon sits in water, and;
Recovery phase - recover - the spoon is above water and the rower slides forward (actually sternwards).

To develop a good picture of the rowing stroke, we these have subdivided positions:
Ø First half (beginning) of the recovery,
Ø Second half (in the middle of) of the recovery,
Ø Placement (catch) of the spoon in the water,
Ø First half (beginning) of the drive,
Ø Second half (in the middle of) of the drive, and
Ø The finish and extraction

Changes of the angles of knees, hips and elbows determine the work positions of the most important muscles in legs, back and arms. To simplify the learning process three control points the for each position are used:
Ø Knee angle - leg stipulates action and the place of the bankje
Ø Hip angle - the stipulate position of the upper body
Ø Elbow angle - arm position and arm ' work '


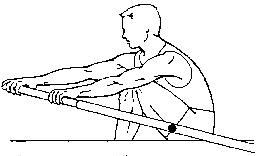
Fig 1. The angles of the most important muscle groups which are used in rowing.Left the angles at the catch, Right the angles at the finish.

The analysis of the stroke cycle starts with the first part of the recovery. During the recovery the rower not only slides forward, but the preparation (body preparation) for the critical moment of the placement of the spoon in water takes place.

Insufficiently forward body angle causes a range of errors: with hands and shoulders diving into the boat at the catch, the spoon moves, invegen from water, etc. For this reason the importance of good recovery and body preparation cannot be emphasized sufficiently.

Sculling
First half of the recovery

The knee angle is flat, the seat is in the hindmost position.
The hip angle is open; the upper body is in ' lay-back ' position.

The elbow angle is flat; the arm has been stretched and the upper body moves from Lay-back to a more upright position. Then the glide phase starts forward.

This position is a very important point in first half of the recovery. The body is still in lay-back the position, whereas the hands move away from the body.

Second half of the recovery
The knee angle has been bent slightly; the seat is itself in the middle of the slide.
The hip angle is rather sharp; the body leans forward to maximum reach.

The arms have been stretched. It important that the arms are fully stretched has been stretched body position fixed, so that you only slide to the catch.

Placement of the spoon in the water - the Catch
The knee angle is sharp; shins are in full compression almost vertical position
The natural body attitude has been bent forward slightly from the hip reaching with the upper body. The sitting position is ' high ' and relaxed; you use complete length and reach.

The arms have been stretched entirely.

First half of the drive
The knee angle becomes flatter. After the placeemnt of the spoons in the water, the body weight is transmitted on the stretcher by use of leg strength. The seat has been pushed back.

The hip angle remains the same. Because of this horizontal power application occurs. The muscles in back, shoulders and arms give backpressure, as a result of which a good link between legs and spoon occurs. The upper body does not come over.
The arms remains stretched.

Second half of the drive
The knee angle is almost completely flat. The seat sits on the last quarter of the sliding. The legs are themselves in very efficient position, flat for the last push down.
The hip angle has been opened; the body swing supports the leg drive. The upper body is high and (almost) vertical.

The arms are still stretched, ready for them to start bending. At crossing the hands the bowside hand is flat above the stroke side hand.
The oars come almost perpendicular on the boat, mechanically a very efficient part of the stroke. The body weight hangs still between the oars and the stretcher.

The Finish and Extraction
The knee angle is flat and the seat is in rearmost position. The legs and back are almost completed. The legs continue to push against the stretcher, through the finish.
The hip angle is open, the torso is in the lay-back position, approximately 25 degrees past the vertical. The head and the shoulders are behind the handles.

The elbow angle decreases as the hands move to the finish, supported by firm push of the legs against the stretcher. The forearms are horizontal.

You must maintain pressure on the spoons, in spite of acceleration the boat.

At extraction the hands finish a circle movement down and away, without touching the body. The bow side is flat above the stroke side hand, until the hands are next to each other and at the sides of the body.

Sweep Rowing

First Half of the Recovery


The knee angle is flat, the seat is in the hindmost position.
The hip angle is open; the torso is in lay-back position.
The elbow angle is flat; the arms has been stretched and ' draws ' the torso from lay-back to a slightly forward leaning position. Then the glide phase begins.

This position is a very important point in first half of the recovery. The body is still in lay-back the position, whereas the hands move away from the body.

Second Half of the Recovery


The knee angle has been bent slightly; the seat is in the middle of the slides.
The hip angle is rather sharp; the body is ready with forward lean (body preparation). The outside shoulder is further stretched and is higher than the inner shoulder.

The arms have been fully stretched. It important that the arms have been completely stretched and the body pivoted forward, so that you must slide only to the catch.

Placing of the spoon in the water – The Catch

The knee angle is sharp; shins are in full compression almost vertical position.
The natural body attitude has been bent forward slightly from the hip reaching the torso. The armpits are high and relax themselves, you use yourself complete length and reach. The outside shoulder keeps a little higher than the inner shoulder.The arms have been stretched entirely.

At maximum reach the spoon goes into the water. The back does not rise; only the hands place the spoon in water. The speed of placement is critical. You want you ensure that the optimal place for the catch is not missed. The efficiency of the leg drive will be lost if the spoon is not put immediately complete in water.

First Half of the Drive


The knee angle becomes flatter. After the placement of the spoons in water, the body weight is transmitted on the footboard by use of leg strength. The seat has been begun to move.


The hip angle remains the same. Because of this horizontal power application occurs. The muscles in back, shoulders and arms give back pressure, as a result of which a good link between legs and spoon arises. The torso does not rise.

The arms remains stretched. The outside shoulder has most of the tension.

Second Half of the Drive


The knee angle is almost completely flat. The seat sits on the last quarter of the sliding. The legs are themselves in very efficient position, flat for the last push down.
The hip angle has been opened, the body swing supports the leg drive. The torso is high and (almost) vertical.

The arms are still stretched, and about to start bending.

The oars come almost perpendicular on the boat, and are in a very mechanically efficient position. The body weight hangs still between the oars and the footboard

The Finish and Extraction


The knee angle is flat and the seat is in hindmost position. The legs and back are almost finished. The legs continue push finishing against the footboard, well supportive.

The torso comes in maximum lay-back; the outside shoulder is a little higher than the inner shoulder. The head and the udder are themselves behind the oar.
The elbow angle decreases as the hands approach the finish, outside forarm is horizontal
At the extraction the rower in lay-back position. The hands finish a circle movement down and away, without touching the body.

Grip
Beginners must learn a correct grip of the oar early. A wrong grip causes a lot of errors and is not easily correct. Did not be afraid to invest time in teaching a correct grip for beginners. Teach them how to hold an oar before anything else, Every training session should start with attendtion to the correct grip and rotation of the oar.

Sculling Grip
The scull grip must be relaxed to be with one's index fingers on the end of the handle and the thumb on the end of the handle.

The other fingers have been bent around the grip. The palm is not on the handle and the wrist remains virtually flat, both during the drive and the recover.

Twisting at release and catch happens by use of the fingers, as a result of which the handle ywsts in the fingers. The wrist remains flat.

Sweep Grip
The hands are approximately 2 hand breadths from each other have been put on the oar handle.

The fingers joints have been bent for the grip, with thumbs under the handle.
Both wrists are flat, with the hand palms apart from the handle. The oar must be carried by the fingers, not to be held in the hands.

At extraction the fingers of the outside hand press the handle down. (At sweep rowing the outside arm is most distant from the spoon). The oar is twisted by movement of the inner hand. It is important that the outside wrist remains flat. The outside wrist of the rowers remains flat, whereas the oar in the fingers rotates.

Squaring happens by the fingers and thumb of the inner hand, where the fingers of the outside hand remain around the handle. Twisting the handle, both at catch and extraction, in done by only the inner hand.

The outside hand remains relaxed and flat, as a result of which the rower can rotate the handle in the fingers. The use of the outside hand and arm in the catch is very important, because the outside arm has a longer gearing. The fingers of the outside hand cannot be ' separately ' of the oar. The outside hand and arm must be prepared immediately after the catch to take the pressure.

Blade Work

The blade work has direct consequence on the movement and speed of the boat. For this reason many coaches give more attention on correct blade work than to the body movement. However, the blade work is an direct consequence of what happens in the boat. It is possible for the body movement or the blade work to change and on the other hand improvements to see. An example of good blade work
Recovery

During the recovery the spoon moves in a smooth, horizontal movement toward the bows. The rower must have sufficient space to square the spoon, without touching water.

Squaring for the Catch

Ideally twisting the spoon starts as the hands move over the ankles. Turns must happen quietly, during the last bit of the recovery. It must not influence the horizontal movement of the spoon.

The Catch

The placing of the spoon in water happens rapidly, as a continuation of the recovery. It must be coordinated on the speed of the boat, without much back-splash or front-splash. For beginners however, a small back-splash is advised, to ensure that no water is missed. The weight of the oar does not ensure the catch speed. The placing of the spoon in water, must be followed immediately by the horizontal power application as the blade is covered.

Drive

During the drive the spoon must sit 2-3cm under the water. Because the boat accelerates during the drive, it is important also the handle accelerate, as a result of which the horizontal movement is maintained.

Extraction

The rower must make a smooth, fluent, half-round movement, to get the spoon out of the water. Feathering happens after the spoon is out of the water.

The path of the spoon must be linked both during the drive and the recovery by horizontal movements, and by round movement, as the oars change direction.
The complete movement (turns, catch, extraction and recovery) must related be to the speed of the boat and the tempo.

Summary

The basic rowing technique is a logical, natural movement. There is no space for drastic, abrupt movements which limit the speed of the boat. Body action, blade movements and movements of the seat must be all in harmony with the speed of the boat.

Drills and Word Images

Drills and Word Images Found Effective in Coaching the Four Phases of the Rowing Stroke
Level 2 Technique
Presented by the USOC Development Camp
By J Philip Monkton
==================
The Release

DRILLS
Rowing with one arm only, either inside arm or outside arm
Rowing with blades square to learn downwards pressure needed to extract oar from the water
Rowing half slide
One person rowing in pair oared boat shows effect f dumping finish into the lap
Pick drill with or without feather to develop finish timing
Release and glide

COMMENTS OR WORD IMAGES

Move the pin by the blade
Uncoil the body on the drive
Keep constant pressure on the foot stretcher and the pin throughout the drive and release
Build the speed of the handle during the drive
Drive the hips into the bow
Pry the boat forward
Hang your body weight on the oar to assist in the pulling

The Catch

DRILLS
Row single strokes, starting and stopping over the knees
Pick drill
High stroke pick drill
High stroke paddle
Row with squared blade and catch on coach’s/cox’s command
Intentionally make blacksplash at catch to reinforce blade near water at catch
Outside hand to set the square
Single man rowing in a pair

COMMENTS AND WORD IMAGES
When coach says quicker at the catch it usually means earlier in the stroke cycle
Take the catch as you reach front stops not when
Roll the wrist up at the catch
Balance of the oar makes burying of the oar automatic as oarsman mearly guides the oar in
Pick files off a table
Unweight the hands as you approach the catch
Loop the blade in
Put the blade in a slot in the water
Anchor the blade behind a peg
Don’t kick, push
Make sure that the wheels are still rolling forward when the catch is started

The Recovery

DRILLS
Pause with hands over the knees at extended back position to demonstrate position of body out of bow
Pick drill
Fractional use of slides to develop awareness of control ¼, ½, ¾ slide
Alternate power and paddle strokes to maintain relaxed recovery on power similar to paddle
Ultra slo-mo rowing
Stop on coaches orders during recovery
Row with feet out of stretchers
Stroke play at ¼ power with strokeman raising or lowering the stroke at will
Turn oar full revolution of oarlock during the recovery
Row with eyes closed

COMMENTS OR WORD IMAGES
Let the knees rise slowly
Don’t lift knees until you feel a slight pull on top of thigh behind kneecap
Watch the knees come up
Listen to the wheels on the recovery
Rebound out of the bow
Sit lightly on the seat, feel weightless on the recovery
Keep posture natural
Pivot forward on the cheekbones
Curl out of the bow by doing a sit up

The Drive

DRILLS
Pick drill
Drive with feet out of stretchers
Row single strokes with concentration on the drive
Draw with the outside arm
Accelerate through the drive
Feel the tension in the lower back and hold the back against the leg drive
Pinch the shoulder blades together


COMMENTS AND WORD IMAGES
Move the pin by the blade
Uncoil the body on the drive
Keep constant pressure in the footstretchers and the pin throughout the drive and during the release
Build the speed of the handle during the drive
Drive the hips into the bow
Pry the boat forward
Hand your body weight on the oar to assist in the pulling

Developing a Coaching Philosophy

Developing a Coaching Philosophy
By Steve Mergelsberg, Assistant Men’s Basketball Coach, University of Rutgers-Newark
From http://www.teamarete.com/developingacoachphil.html
--------------
As a new and inexperienced coach, there is much preparation for your first season. Of course, you are excited and eager about your first head coaching position. You most likely have planned what you are going to do and believe that you are ready. But are you truly ready? Have you thought about the how’s and why’s of everything you will do as a coach? It is important as you get started in coaching to develop a philosophy. For that matter, even the experienced coaches may want to reevaluate their philosophy.

Many coaches do not believe in the value of developing a coaching philosophy. They do not realize how a philosophy can have an impact on their daily coaching procedures and strategy. However, a coach’s philosophy is actually a very practical matter. In fact, every coach, aware of it or not, follows certain principles based on their own playing experience. Most of our basic philosophy emanates from former high school and college coaches. This is a natural start, because it is the approach with which we are most familiar and comfortable.

It is also reasonable to assume that the philosophy of a person’s everyday life thinking and actions would be applied by most when it comes to coaching. For example, a salesman discovers that one of his clients is dishonest. He decides to sell to a competitor despite the fact that he will make less of a profit selling the same product. This may not sound like good business practice, yet many people are willing to adhere to their principles even if it meant making less money. How many coaches would stick to principles of sportsmanship or fair play rather than win the game? We can see a gap between what a coach may think is the right thing to do in every day life, and the actions they may end up taking on the field or court.

In your effort to form or analyze you own philosophy of coaching we must first know what a coach is. A coach can be many things to many different people. A coach is a mentor, a teacher, a role model and sometimes a friend. Most of all a coach must be positive. A positive coach has the following traits:

Puts players first:
A positive coach wants to win but understands that he is an educator first and the development of his players is his top priority. He avoids thinking the game is about him rather than the players. Has an unwavering commitment to what is best for the athletes.

Develops character and skills:
A coach seizes upon victories and defeats as teachable moments to build on self-confidence and positive character traits such as discipline, self-motivation, self-worth and an excitement for life. The desire to see the athlete learn and the ability to effectively improve their skill is the key to an effective coaching program.

Sets realistic goals:
Focuses on effort rather than outcome. Sets standards of continuous learning and improvement for the athletes. Encourages and inspires the athletes, regardless of their skill level to strive to get better without threatening them through fear, intimidation or shame.

Creates a partnership with the players:
A positive coach involves team members in determining team rules. Recognizes that communication is crucial to effective relationships with players. Develops appropriate relationships based on respect, care and character.

Treasures the game:
A positive coach feels an obligation to the sport they coach. Loves the sport and shares that love and enjoyment with the athletes. Respects the opponents, recognizing that a worth opponent will push the team to do their best.

There is no level, where as a coach, you cease teaching the game. As long as you teach, teach in a positive manner. You will produce the best players, and ultimately, the best results.
It is extremely important to develop a philosophy with the following statements in mind:

Your approach should be educationally sound.
Your drills should serve a purpose and not merely used for “killing” time. They should be structured to provide the necessary repetition for each athlete and should be relative to the athlete’s ability level.

Your approach should be appropriate for your players.
You may learn a lot of new offenses and defenses and they may be excellent systems, but are they suited for your players? Use an approach that is developmentally appropriate to your players.

Your philosophy must be ethical.
In basketball, for example many coaches instruct players to fake an injury in order to stop the clock. This is unethical. Consider what you do in all aspects of coaching. Coaching from an ethical standpoint is extremely important. Remember, you are a role model for your players

Stick to your philosophy.
Most coaches, especially on the high school level, have to develop the talent on hand. There may be some years in which the athletes may not possess the ability or skill to fit into your philosophy.You cannot change the players, but you can alter your approach.

Is there a better way of doing what you are doing?
Apply this question regarding all aspects of your coaching philosophy-the offense, defense, motivation or your athletes, etc. Keep an open mind. Learning should be a life-long pursuit and this should definitely apply to your coaching philosophy.

Explain why you do the things you do.
To instruct and to motivate your athletes, you have to justify what you do. Can you? You better be able to.The days of just simply saying, “Well, this is the way we are going to do it,” are long gone. There is no way that you can justify anything associated with your program or team to athletes and parents without an explanation.

Your coaching philosophy should be compatible with your personality.
Are you a risk taker? Patient or impatient? Deliberate or aggressive? You will be more successful if your philosophy and personality are both in sync.

Sportsmanlike conduct should be a top priority involved with your philosophy.
There are certain situations in some games, which could be considered unsportsmanlike by opponents, officials and fans. Running up the score, playing starters long after the outcome has been determined and taunting are just a few examples to be considered. If any of these exist within your approach to coaching, you may have to make some changes.

After analyzing all the factors that I have mentioned, develop your own philosophy by putting it into written form. It is extremely important to be able to express and to explain your approach to athletes, parents and supervisors. A written document can also give you something concrete to reexamine and to evaluate annually

The Danger in Knowledge

Coaching Development – The Danger in Knowledge
By John Leonard
From http://www.swimmingcoach.org/articles/news.htm
-----------------

Knowledge is an interesting concept. In the Websters New Dictionary the word "know" is defined as:
1) To perceive with certainty; to understand clearly;to be sure of or well informed about. As, we KNOW the facts.

That's the preferred definition. Hmmmm. "To perceive"".... Lets look at perceive.
2) to take hold of, to feel, to grasp mentally,to recognize, to observe. To become aware of.
So, to KNOW something is to perceive it with Certainty. And, to perceive it is to feel, hold, grasp it, recognize it.
So what you know, is what you perceive?

What if what you perceive is limited?
Ø Limited by looking through a microscope at the cells of a whale.
Ø Limited by standing in Manhattan, and looking at the Statue of Liberty.
Ø Limited by listening to only one source.(What if Eddie Murphy was the only person to listen to?
Ø Limited by reading only one opinion.(What if you could only read Rush ?)
Ø Limited by seeing only one quality swimmer.(What if you ONLY saw Janet Evans swim freestyle?)
Ø Limited by only one source for scientific information?(Chinese/East German athletic system?)

This is scary.

Back in 1980, there was an article in Time Magazine that noted a small footnote of a disease found in Haiti that debilitated the immune system of black male homosexuals. The article assured us that there was no danger to any other population.

In 1982, TIME printed that the disease had spread and now, only male homosexuals were at risk. Everyone else was ok. No worries, unless you were a male homosexual. In 1985, TIME's story was that homosexuals, male and female were at risk. No one else need worry.

In 1986, TIME said there was evidence that it was spread through the blood. (and the blood supply for those who had transfusions. No one not homosexual or in need a transfusion need worry.

Then they added that well, maybe a few heterosexuals might have IT also. Then they finally noted that well, yes, it did appear that it was sexually transmitted, as well as blood borne. Now, you note, AIDS is the scourge of the century, with no cure in sight. But in 1980, we KNEW that only black male homosexuals could get it. No worries. Scary. Now, remember, they are absolutely sure that mosquitoes can't carry aids. I'm reassured. How about you?

What does this have to do with swimming?
A lot. One thing that most of us have in common when we start to coach, is that we want to do a good job. To do a good job, we are convinced we have to KNOW something. I read Doc Counsilman's early books, and was absolutely certain that I KNEW that action-reaction was what produced forward propulsion, and anything other than that was a waste of time. And I vigorously fought for that stroke with my swimmers, and with my assistant coaches. Then I met an engineer who talked about funny things like "lift" and Bernoulli's Principle and things...and I thought he was crazy and kept on teaching what I KNEW as correct.

Five years later, Doc and many other people decided that LIFT and Mr. Bernoulli and his principle was the main thing. (And Doc told us, repeatedly, to "QUESTION EVERYTHING", and we thought he was just being modest.) So I learned and KNEW that the new paradigm of lift was "the Answer". Now I am reading material that says that at certain speeds, the Action/Reaction Drag force is the only way to move fast enought. Hmmm....
Yet many of us insist on "knowing" something. And once we have that "perception" of "knowledge", it becomes deeply a part of each of us. We defend what we know with vigor, enthusiasm, and a touch of....desperation? Why? Because we value, and we hope others value, something called knowledge. If we actually "know" less, we are therefore, worth less. (or worthless?)

When I was a young coach, with no achievements behind me, and a very challenging world in front of me, my "knowledge" was all I had. The same is true for many coaches today. Yet that very knowledge, so precious to us, keeps us from doing the very best job we can do as coaches. That's what makes Knowledge dangerous. Coaches are good salespeople. We sell ideas to our swimmer and parents daily. We are selling our "knowledge". (Gulp)

Because its not really KNOWLEDGE in the sense we think of it. Its not TRUTH. Not permanent. Not inerasable. Its changeable. Its a product of perception. A product of what we see, hear, sense, "hold", smell and taste. To KNOW is simply to PERCEIVE. And perception, by definition is faulty.

How do we think we acquire KNOWLEDGE? By Education. Does this put Education in a bad light? Not if the Educational process presents its material in the correct light. What is the correct light? Its INFORMATION. Its what we perceive about a subject right now. As we get a bigger and better microscope, we get more information about the real size and scope of the whale. If we turn around we see a city, rather than a metal lady standing in a bay. We hear Jesse Jackson as well as Eddie Murphy, we read liberals as well as Rush, we watch Matt Biondi and Popov as well as Janet Evans. We get our science from ICAR, from Universities, as well as from the Chinese and East Germans. We want information from many sources.

In short, we gather INFORMATION. And we put it into our coaching TOOLBOX. One of my favorite expressions is "If you only have a hammer, everything looks like a nail." No one tool can address every project or problem. Anyone who builds can tell you that having the right tool is 90% of doing the job the best way possible, with the best result.
Our task as coaches is to build our toolbox. Without getting married to our saw, or our planer, or our chisel. No one idea, no one coaching method, no one stroke mechanic principle is "the tool" for everyone or every problem. We have to gain the set of tools necessary to do the job in each situation which we face. And that takes time, and experience.

The same materials go into your coaches Toolbox, as into your KNOWLEDGE, but you recognize that everything is simply information, and it can ALL be useful. Its up to you to apply the information that you acquire. And you don't learn ONE WAY of solving a problem, decide that you KNOW how to solve that problem from now on, and never look for new tools. There is no one way to build a team, win a national championship, teach a stroke, or a start or turn, plan a workout, plan a season, recruit a swimmer. There are many ways for every task, and they will all work well for someone, in some situation.

First, clear your mind of "Knowledge", then, fill it with information. The information forms your toolbox, and your experience will tell you what tool to use to solve each problem.

The older I've gotten the less I know. But the more experiences I've had, and more information I've touched...maybe not "held" exactly, but touched.
Doc Counsilman was right. Question Everything.

And I'll add, Put It In Your Toolbox.
And expand your toolbox at every opportunity.

Musculature Used In the Rowing Stroke

Anatomy – Musculature Used In the Rowing Stroke
From Thompson, C.W. & Floyd, R.T. (1994) Manual of Structural Kinesiology. Mosby, USA.
------------------

The Drive

Foot and ankle
Plantar flexion
-Gastrocnemius
-Soleus

Knee
Extension
-Rectus femoris
-Vastus intermedius
-Vastus lateralis
-Vastus medialis

Hip
Extension
-Gluteus maximus
-Biceps femoris
-Semimembranosus
-Semitendinosus

Trunk
Extension
-Erector spinae

Shoulder Girdle
Adduction and Depression
-Trapezius
-Rhomboid
-Pectoralis minor

Shoulder Joint
Extension
-Latissimus dorsi
-Teres major
-Posterior deltoid
-Teres minor
-Infraspinatus

Elbow Joint
Flexion
-Biceps brachii
-Brachialis
-Brachioradialis

Wrist and Hand
Flexion
-Flexor carpi radialis
-Flexor carpi ulnaris
-Flexor digitirum profundus
-Flexor digitorum superficialis
-Flexor pollicis longus

The Recovery

Foot and Ankle
Dorsal flexion
-Tibialis anterior
-Extensor hallucis longus
-Extensor digitorum longus
-Peroneus tertius

Knee
Extension
-Biceps femoris
-Semitendinosus
-Semimembranosus

Hip
Flexion
-Iliopsoas
-Rectus femoris
-Pectineus

Trunk
Flexion
-Rectus abdominus
-Internal oblique abdominal
-External olique abdominal

Shoulder Girdle
Abduction and Elevation
-Shoulder girdle adductors and depressors (eccentric contraction)

Shoulder Joint
Flexion
-Shoulder joint extensors (eccentric contraction)
-Deltoid

Elbow
Extension
-Triceps brachii

Wrist and Hand
Extension and Flexion
-Hand flexors (eccentric contraction)
-Extensor carpi ulnaris
-Extensor carpi radialis brevis
-Extensor carpi radialis longus

Saturday, December 1, 2007

Olympic Marathon – Anatomy of a Medal

Olympic Marathon – Anatomy of a Medal
By Joe I. Vigil, Ph.D.

---------------

One of the most compelling success stories of the Athens Olympics was the performance of the U.S. Team in the Marathon. These outstanding performances were the result of not only exceptional talent and discipline on behalf of the athletes, but impeccable planning and application of 21st century sports science.

This article deals not only with the application of science and training methodology, but also the athlete/coach interrelationship, vital for the success in any athletic endeavor. Although Team Running USA had two medalists in the Marathon – Deena Kastor (Bronze) and Meb Keflezighi (Silver), this article will deal with the specifics of the training progression of Deena Kastor.

This success was not an overnight achievement. It started 20 years ago when Deena’s involvement in age group athletics first started. From the very beginning, she showed signs of things to come. After winning several California state high school championships, she enrolled at the University of Arkansas. Her collegiate career was good but not exceptional. She earned several “All American” recognitions in both Cross Country and Track & Field, but she never won a national championship. The outstanding talent she displayed as a high school runner was never realized in college.

I first met Deena when she competed for the U.S. Jr. Cross Country Team in the World Championships in Aix Le Baines, France. In our first meeting, we developed an instant mutual respect. I learned that at the completion of her University of Arkansas studies, Deena found herself with a burning desire to continue her training. Like most, she dreamed of one day running in the Olympics and, at the urging of her Arkansas Assistant Coach, Mylan Donley, she contacted me. At first I was reluctant to work with her, but her persistence, hunger for high goals, and willingness to relocate to Alamosa, Colorado (7543¢ altitude) persuaded me to take her on. Hence, a team was formed.

Qualities Necessary for Success
I believe it was the best professional move either one of us has ever made. Her accomplishments the last eight-ten years (1996-2005) have been spectacular. The qualities necessary for this level of success and the progression of her physiologic profile came at a great price.

As with all members of Team Running USA, we required that all athletes strive to:
Improve Personal Relationships
Improve Achievement Motivation
Improve the Quality of Their Mini and Macro Environments
Improve Their Athletic Maturity
Show Integrity to Their Value System
Display a Commitment to Their Mission
Practice Abundance by Giving Back to Their Sport and Team

If I were to operationally define the qualities an athlete must possess to be successful, Deena would epitomize those qualities. She is a great example of mind/body autonomy working in harmony to reach set goals. She truly believes and adheres to the principle of unending improvement and the setting and achieving of even higher goals.

Increases in Volume
Knowing that I had an athlete willing to go the extra mile, we started working on the physiologic variable that would allow her to compete at the international level. Previously, she was only running 40-50 miles a week, which certainly was not enough volume to compete at her desired level. We increased that volume to 70 miles per week (MPW) for the next 15 months. This allowed for gradual adaptation without any resulting injuries or setbacks. At this point, she had a VO2 MAX of 70.2 mls. (VO2 MAX is the maximum amount of oxygen in milliliters your body can use in one minute per kilogram of body weight, i.e. the higher the better). We next increased her volume to 90 miles a week over the next 18 months. Her VO2 MAX jumped to 77.5 mls. During this time period, she was making her mark nationally and had won a national championship in Cross Country. Again, we increased her volume to 100-110 miles per week and, not surprisingly, her VO2 MAX was at 81.3 mls. This level of fitness is attained by very few athletes and is one of the highest ever recorded in an American athlete.

Presently, we maintain an average of 100 mpw ±10 and adjust that volume in accordance with the competitions she will enter. The volume can be as low as 70 mpw for track races to 140 mpw for a marathon. Because of our precise planning, she handles this volume manipulation very well.

We both knew VO2 MAX was important, but even more so was the increase of anaerobic threshold (AT - the point at which lactic acid starts to accumulate in your muscles). Since this became an important training objective, we incorporated the AT runs, sometimes referred to as tempo runs. We started with four miles and over a period of time, increased to six, eight, and ten miles. If we were preparing for a marathon, she would run 12-13 mile AT runs. We thoroughly believed that the longer the run, the greater the stress, the greater the consequent adaptation.

A noticeable observation was made over the five-six year period of increased volume; her AT velocity increased profoundly. She went from an initial 5:24 per mile pace to 5:11 to 5:01. I would like to state that volume runs, when combined with a regular diet of AT runs, are the most important workouts for the development of the endurance component. This brought about a profound increase in her running economy.

Equipped with these two remarkable qualities (increased VO2 uptake and increased anaerobic threshold), any athlete can then embark on running and competing at the international level. We must keep in mind that these increases were brought about through gradual adaptation to stress. As we worked together on a day-to-day basis, Deena learned to listen to her body and knew exactly what her perceived exertion was at a given pace.

Training Priorities
After each human performance test, we had accurate information on her velocity at VO2 MAX (vVO2), anaerobic threshold velocity (ATV), lactate max, lactate at threshold, max heart rate (HR Max) and heart rate at threshold velocity. Armed with this information, we got her vVO2 (which was 4:27 for the mile). This figure would help us in determining her goals for the 3000, 5000, 10000 and the Marathon. We also determined that her fractionalization (VO2 at threshold velocity divided by VO2 MAX) was a percent we would like to improve. We followed the protocol below in determining goals:
3000 Meters 7-12 Minute Effort 100% vVO2
5000 Meters 13-17 Minute Effort 95% vVO2
10000 Meters 26-38 Minute Effort 90% vVO2
Marathon 2:06-2:30 80-85% vVO2

This information was deemed extremely accurate, as Deena was only off two seconds in her AR in the 10000 and Meb1.93 seconds in his 10000 AR. After determining their fractionalization (Deena 83% and Meb 81%), we established their goals for the Marathon. Again, Meb missed it by only three seconds and Deena by only 1 minute 16 seconds. Our objective for the future will be to increase fractionalization by utilizing volume and AT runs at the appropriate distance and velocity.

Altitude Training
The record has shown that since 1968, 95% of all Olympic and World Championship medals from the 800 through the Marathon were won by athletes who lived or trained at altitude. It can therefore be concluded that altitude training is necessary for success in endurance events. I have lived all my life at altitude in Alamosa, Colorado (7543¢) and it was easy for me to become a true believer in altitude training. The observations I have made and my background in physiology has shown me that there is a distinct advantage to altitude training.

Over the past 30 years, I have hosted individuals and entire federations for their altitude training. The successes include World records, Olympic medals and personal bests. Most of the distance running world has bought this philosophy. It has, however, been difficult to convince most American coaches and athletes, though there are a few that believe.
When Team Running USA was organized in 2000, Bob Larsen and I were hired to run the program. We both believed in altitude training and incorporated three-four altitude training blocks of one month or longer in our annual training plan. We selected Mammoth Lakes, California (8000-10,000¢) as our official high altitude training camp. We also tried to hold our camps prior to major events so they could go down to sea level with the greatest amount of oxygen carrying capacity possible.

Deena had spent four years (1996-2000) in Alamosa when we made our move to Mammoth Lakes, CA. The next four years (2001-2005) gave her a greater adaptation to altitude and she was capable of training at even high altitudes (9000¢), which she did frequently. On occasion, we would go to sea level to train at ARCO OTC in San Diego. This was also the site for all of our testing protocols. We were, however, altitude-based the majority of the time.
By living and training at altitude, athletes expect to get an increase in their red blood cell mass and hemoglobin, which enhance the athletes’ oxygen carrying capacity. These factors allow the athlete to perform and train more effectively upon return to lower elevations.

Olympic Event Decision
Upon consideration of all the negatives and positives of the geophysical conditions we would encounter in Athens, 11 months prior to the games, Deena decided on the Marathon. I believe she could have done as well had she selected the 10000 meters, but her choice proved to be a wise. We began by running Olympic Trials for protection against injury. This way she would be assured of making the Olympic Team. She decided to dedicate 11 months to the best and most difficult training she ever had, as well as competing a minimal number of times. The focus for the year was to medal in the Marathon. She, along with her three training partners, Colin Steele, Joe Eckerly and Derek Tate, put together 14 weeks (See Table 1) of excellent training that produced a fitness level she had not previously experienced.

Table 1.This table illustrates progression in weekly volume. It can be utilized by more experienced marathoners who can handle the increased volume.

Critical Zone Training
Critical Zone Training (CZT) is a phrase coined to identify training requirements for success at the Olympic Games, World Championships or specific high quality events. The training demands are specific to the event and incorporate the times athletes must achieve in practice to be able to compete at the above levels.


The average times in the Marathon for the previous four Olympic Games and five World Championships were 2:26:45 for First, 2:27:34 for Second and 2:28:16 for Third. Our goal was to medal, so we had to train to achieve these times under all conditions. The topography of the Marathon course in Athens is shown in Figure 1:

Figure 1: Profile of Athens Olympic Marathon Course

One can observe the torturous eight-mile incline from 18000 meters to 31000 meters. I found a very similar course close to Mammoth Lakes, where nearly all aspects were identical. The one difference was that it was at 7000-8000¢ altitude. We ran it seven times prior to Athens at a pace that was altitude-adjusted. The course in Athens presented no psychological barrier for Deena.

To meet the extreme demands of heat and humidity, we did three things:
We wore extra clothing in practice.
We practiced on fluid intake on our long runs every 15 minutes for 11 months.
We went to Crete two weeks prior to the Games to acclimate to the heat and humidity.

While training in Crete, we encountered extremely hot weather, always around 98°-104°F. We adjusted our workouts by running hard early in the day and easier in the late afternoons. As the days passed by, we progressively moved the intense workouts toward the time that the Marathon was going to be contested. Crete is in the same time zone as Athens, so our circadian rhythms had 14-17 days to adapt to the time zone of the competition. Constant reinforcement in hydration, rest and diet was carried through to the end.

As expected, the temperature at race time was 102° (120° asphalt) and 54% humidity at 6pm. As with other marathons, Deena knew she was going to have to exercise complete emotional control throughout the race. This is a quality she displayed beautifully, as the race results indicated.

Deena’s support team included her husband, Andrew (Physical Therapist) and three training partners. In Figure 1, the last 14 weeks shows her volume and taper prior to the race. The daily sessions of ancillary work (core, plyometrics, strength, flexibility) and agility drills over a number of years made her an exceptionally well-prepared athlete. Our specific training program consisted of the following training intensities:

Training Intensities
Basic Speed/Power: From 60 to 100 up to 400M speed endurance. Below 200M, all out at 300-400M race pace early. Then pick up pace with each repetition. This workout aids in the development of running form, running mechanics and event-specific running economy.
Lactate Threshold: Training runs of 20-60 minutes at 85-87% of HR or 85-87% of vVO2 aids in developing a high level of aerobic threshold.
High-End Aerobic Endurance: Endurance training at 70-80% of maximum HR or 75-80% of vVO2. The duration of runs should be 30 minutes to three hours. The runs should be on soft surfaces and hills. Negative split effort is most desirable.
MVO2: Development of maximum volume of oxygen at 90-95% HR or 90% of vVO2. Three minutes to eight-ten minute duration or repetitions of 800, 1K, 2K and 3K. We use two minute intervals between repetitions at sea level and three minutes at altitude. These runs develop peripheral training adaptations, increase fat metabolism, increase concentration of aerobic enzymes, mitochondria and capillarization.
Recovery: Low intensity runs 25-30 BPM below lactate threshold HR. The runs are from 45 minutes 1 hour 20 minutes and can be run both in the AM and PM. It promotes recovery following high intensity workouts. This run energizes the athlete for the next hard workout.

It is extremely important that the athlete and coach orchestrate the Five Training Intensities so they have proper recovery and maintain enthusiasm for the challenges to come. Table 2 exhibits the plan we employed:


THE RACE
I was not able to go to the starting line because of the traffic and crowd controls. In my last conversation with Deena before race time, she confided in me and said, “I have done every workout you have prescribed over the last seven months. I feel fitter than I have ever felt and I am confident that I will medal today.”

Along with her many supporters, I went to the historic Panathinaiko Stadium, home of many famous marathons, to watch the race unfold. As I sat and watched, I recalled all her training sessions throughout the previous 11 months as well as her volume (40,000 miles of training) the previous eight years. I, too, was confident she would medal. We watched on the giant TV screen as she moved progressively from 28th position to 3rd, running courageously, methodically, with confidence and emotional control.

To work with an athlete of the caliber of Deena Kastor comes once in a lifetime, and I have enjoyed every minute of it. Her Bronze medal was certainly a highlight of the Games for the American Team and legions of American distance runners back home. The biggest impact into the future will be the courage, the work ethic, her passion for the sport and the leadership she displayed on her memorable journey.

This showed that Americans, with proper training, are as good as any runners in the world. Young American runners in their developmental stages will try to emulate her and now know that their dreams and visions are realistic and possible, for they too can medal in the Olympic Games. Thank you, Deena.

XC Endurance Training Theory – Norwegian Style

XC Endurance Training Theory – Norwegian Style
By Stephen Sieler
From MAPP http://home.hia.no/~stephens/.
---------

Borrowing from theoretical physics lingo, I am going to try to present a "Unified Field Theory" if you will of Cross Country ski training, from the standpoint of endurance capacity development. Unified because it represents a conceptual blend of my own experience, understanding of the physiology, translations from the Norwegian training literature, and numerous conversations with a national class coach here whose insights I value and trust. Field fits too, because I am going to try to talk in terms that make sense out in the field, not just in a lab. Unfortunately, a lot of sport scientists can't think beyond the lab and the "8 week study." Theory is also appropriate, because no scientist worth his bodyweight in salt would propose to have the all complexities of physiology and training adaptations nailed down.


I should also point out that this framework does not assume limitations on training time, it is based on the long term development of elite athletes. This is an important point. Much of the research based on untrained or moderately trained individuals doesn't apply to the elite. However, although this material is built up from elite training experience, the basic principles have relevance to us all.


The Big Picture
Below is a training intensity chart, similar perhaps to many you have seen before. It is a closely patterned after the basic intensity classifications for endurance training used by XC skiers and trainers in Norway. When they denote training intensity, this is the language used. I have added another column, lactate concentration. These values are based on several sources including long term studies of elite rowers in Germany. I think rowing and XC are very similar because they are both quadripedal exercise modes.


* Heart rate is based on the average value at the end of an interval bout or on the top of hills in other training forms.
** Explaining the Two Thresholds I need to write another separate article on this issue of blood lactate and exercise intensity. The basic lactate threshold (also called anaerobic threshold) concept is a useful tool but also over-simplistic. The traditional way of viewing the lactate threshold is that it is the exercise intensity at which the working muscle becomes "anaerobic" and lactic acid production commences. This is wrong, but the idea persists in the popular literature because it is an easy concept to get across.

The reality is this. Even at rest we are producing lactic acid in small quantities. Blood concentrations stay low because this lactic acid that is being produced one place can be taken up and used by another tissue. At low exercise intensities, no or only a very small increase in blood lactate concentration occurs. In fact, we sometimes see blood lactate drop a little from resting values at low exercise intensities, depending on what the athlete just ate. However, if we increase the exercise intensity enough, but not too much, we see blood lactate concentration increase to a new stable concentration. Now we are crossing the Low Intensity Threshold (LIT). At this intensity(s), the blood lactate is not out of control. Lactate removal or clearance can also increase so that a new steady state is achieved. The highest blood lactate concentration that can be maintained during a 30 minute exercise bout corresponds to what we call the Maximal Lactate Steady State or MLSS. This lactate concentration varies with the sport. It is higher in activities that have a smaller active muscle mass like speed skating and cycling (4-6 mM). It is lower in rowing and XC which employ more active muscle mass simultaneosly (3-4 mM). There are also inter-athlete differences, of course. The intensity at which it occurs varies with training status. When the intensity climbs above the MLSS workload, then we have exceeded the High Intensity Threshold (HIT) on the chart. At these intensities, lactic acid concentration would continue to climb over time until the concentration becomes high enough to inhibit muscle contraction and causes fatigue. The rate of accumulation will depend on how high above this threshold the intensity is and how effective the body is at clearing blood lactate. We have growing evidence to indicate that the best endurance athletes have higher lactate clearance rates. They get rid of lactic acid faster. So LIT represents an intensity at which blood lactate begins to rise. Between LIT and FIT we are working in a range where the increased production is accomodated for by increased clearance by non-working muscles, the heart (a lactic acid lover), the liver etc. HIT is the traditional red line, the exercise intensity above which fatigue is just a matter of minutes! How much time can be the difference between winning and losing.

The Basic Recipe
Here are the basic philosophies of the Norwegian system with some explanation and comments along the way:

1. Build the program around weekly high intensity training/intervals!
XC country skiing races are won by athletes with VERY high maximal aerobic capacity. This capacity requires both genetics and hard training. The athlete should build the program around TWO hard/interval sessions per week. In general, the emphasis is on long intervals in the 3 to 8 minute range. This 2 hard session/week rule of thumb is a consistent feature from the junior level all the way up to the international class. For example, here is some actual training data for three elite Norwegian skiers when they were juniors (18-19 years old), during the competitive season.
Vegard Ulvang: 1.9 interval/hard training sessions pr week (including competitions)
Anders Eide: 1.6 " "
Anita Moen: 1.9 " "

All three were averaging 8.5 hours/week volume during the racing season at that age (a volume which is significantly reduced from what they do during the preparation period). Interval/hard sessions are part of the training program beginning in August and through the competitive season, which concludes in early April. The only period where we see a deemphasis on high intensity work is during May, June, and July. So, when I get asked the question, "when should I start doing intervals?," I usually reply "two months ago." Hard training bouts at high physiological intensity are an important part of the training program most of the time. What will change is the absolute intensity (and duration in some cases) of these bouts as the athlete approaches competitive form.

Similarly, international medal winning athletes like Marit Mikkelsplass and Kristen Skjeldal, who are 10 years older or more and competing at the international level, are still averaging 2 hard sessions per week, according to their coach. So, the number of high intensity sessions/week does not increase over the development of the athlete. However, with the improved basic endurance that they develop over years of increasing training volume, the quality of these hard training sessions does improve. This is a fundamental concept of the preparation of XC skiers. High volume, low-intensity work builds the basis for extending the athlete's performance capacity with the hard sessions. The two are complementary. At the elite levels, both are necessary for success.

The interval/hard sessions have the primary effect of stressing the cardiovascular system. We think this is very important for increasing/maintaining a high maximal oxygen consumption. These sessions also are important for stressing the lactate clearance and buffering systems which are stressed during competitions. High intensity interval training IS NOT an ideal method for inducing muscular adaptations such as mitochondrial proliferation and increased capillary density. The adaptations induced by high intensity sessions occur relatively quickly, but are also more quickly lost with inadequate volume of high intensity training.

2. Do (most of) the remainder of the endurance training volume each week at LOW (below the LIT) intensities.
The volume of this work does change and can be quite high, depending on where the skier is in their development. At the extreme, these sessions can be 4-5 hours long in elite athletes who are accumulating 25 hours a week of training volume. The key concept is that the long distance training is also critical but should not diminish the quality of the interval sessions. If something has to be reduced, it is the low intensity volume, not the interval volume or quality. The operative Norwegian word here is "overskudd" or overshoot. We want the athlete to feel psychologically ready and be physically rested to perform those hard, high quality sessions. The low intensity training is vital because it builds the muscular endurance foundation necessary to allow the cardiovascular system and lactate removal systems to be stretched to their limits during the intervals without overstressing the recovery capacity of the athlete.

This "hard core" philosophy is a departure from thinking and practice 10-15 years ago, when the training volume was considered the key element.

The primary adaptation acheived with a high volume of low-moderate intensity training is at the muscular level. Mitochondrial density increases, capillary density increases, and cyctosolic enzymes involved in fat metabolism are enhanced. It appears that these adaptations can take years to be fully realized. It is important to point out a few points here. First, despite the fact that the very best junior skiers have VO2 max values that are similar to the best senior skiers, no junior skier has ever won a world title. The increasing training volume that is adapted to over several years of high level training seems to be important, even after VO2 max has plateaued. Second, an alarming trend that has occurred over the last several years is that top skiers are reaching their peaks later in life. And, junior skiers who take the step up to the World cup level are taking longer to achieve good results. In Norway, it has been suggested that one of the problems is that junior skiers do not put in the training volume they used to. Too many cars and busses. This is a distraction that Kenyan children have avoided so far, to the demise of the western distance running establishment who chases them from a widening distance.

The Progressive Overload Principle In Action
Total training volume increases progressively over the developmental cycle of a cross country skier. Here are some guidelines for yearly training volume (hours of actual training), in relation to age. These numbers come from material presented by current Norwegian men's national team coach Eric Røste.
Annual Training Volume in Relation to Age:

Keep in mind that this is a progression based on long term development. The late starting athlete is not going to be able to automatically handle those high training loads, just because they are older! When the training is broken down into percentages of hard and "easy" training, it comes out to around 15 to 20% hard and 75-80% "easy" or "steady." Coach Røste also points out that there is some hidden intensive training that occurs during the long steady state bouts (big terrain changes). I hesitate to use the term "easy" this describe this low intensity form of training. The actual Norwegian term used is "langkjøring" or long running. Distance, not time is of the essence here. A 3 hour trail run in the woods, kayak session, or climbing-intensive hike with back pack in the mountains is not "easy" if have only been doing "60 minutes and out" training!

3. In General, Avoid "Middle of The Chart" Intensities.
This should not be taken too dogmatically. Sometimes the intensity climbs during a steady state workout as a function of the terrain, or getting chased by a dog! And even the top skiers say that sometimes it is a nice variation to pick up the pace just a bit on the long tours. However, the main point is important:

"Train too hard on the easy days, and soon you will be training too easy on the hard days!"
Ok, after reading so far, two questions might be swirling about in your brain:

1. "If interval training is so important, why not do more?"

and

2. "Why not do more of the low intensity distance training at higher intensity, or in other words, what is wrong with the "pretty tough" medium intensity workout?" Whatever happened to "No Pain, No Gain?"

I think answering both requires not only a knowledge of muscle and heart physiology, but an understanding of the "whole athlete". Historically, many people have made the mistake of thinking of training one-dimensionally. By this I mean they only think of training as a means to induce the positive physiological changes that result in better performance. This type of thinking rapidly leads to the "more intensity is better" or, more precisely, "more intervals are better" mentality. In the lab, numerous sport scientists have designed short training studies with untrained subjects and demonstrated that those who train at higher intensity improve more in the short run. I have done it myself, having made rats run hard intervals 5 days a week before! Clearly, intensity is a critical determinant of the training response. BUT, pushing intensity too far, too often leads to big problems when we try to extrapolate to the long term development of the elite endurance athlete.

Training must be thought of "two-dimensionally." The first dimension is training as inducer of positive change. The second dimension is training as a stress that does cellular damage, alters brain chemistry, and disturbs hormone levels, negative consequences all in all. When we realize that the training sword cuts both ways, then the "magic" of ensuring the long term progress of the elite athlete can be understood as an exercise in maximizing the "Benefits to Risk ratio," both from week to week and over the long haul.

The answer to both "why not more interval sessions?" and "why so much low intensity steady state work?" is similar I think. I call it avoiding regression towards the mean. If we try to do hard/interval training (read: high lactate accumulation over many minutes) too frequently, we either break down completely or we end up performing many of the interval sessions at inadequate intensity. It can be either the head or the body that cracks, but the result is the same. If we instead try to turn up the intensity on those "long tour sessions," they become too stressful and too limited by glycogen availability, and we shorten them.

As a related point, one of the best ways to end up overtraining is to have too little variation in training intensity (coined "training monotony" in some nice research on speedskaters and cyclists by Dr. Carl Foster). Athletes can eventually handle high workloads if they successfully avoid letting all the workouts drift towards a middle of the road intensity.

Is this training structure unique to XC skiing?
I would have to say YES and NO right now. In general terms, I would say no. This philosophy of training is generally consistent with observations in rowing, cycling and running (though perhaps less so with running as it relates to the Kenyans). It looks very similar to the current pattern in international rowing. However, some might argue that the high volume of low intensity work is particularly evident in rowing and XC skiing. If that is true, I propose that these sports ARE unique in an important way. They require the simultaneous work of all four limbs. This is an exercise situation that humans have evolved away from. The human cardiovascular system was not designed to support the energy demands of quadrapedal movement. We just don't have the big pumps like sled dogs and race-horses. So, when the upper limbs are added to the mix, the sympathetic stress load is higher at any given absolute work load. This may mean that higher volumes of low intensity work are a better way to train the upper limbs and lower limbs simultaneously while avoiding overtraining. Another approach is to spend more time isolating the upper-body during endurance training. This is an issue I will discuss more in other articles!

A SUMMARY of the "UNIFIED FIELD THEORY" for XC ski endurance training.
1. Build the the typical training week around 2 hard/high intensity training sessions.
2. Increase the total volume of training with primarily low intensity work at not more than 70-75% % or so of HR max. Don't view these long, low intensity sessions as valueless, and don't adopt a "harder must be better" approach!
3. Avoid a training condition in which each session begins to take on the same medium intensity.

Fight Night - Conditioning Methods of World Champion Evander Holyfield

Conditioning Methods of World Champion Evander Holyfield
By Frederick C. Hatfield
From http://www.sportsci.org/news/news9709/Hatfield.html
-------------
Not strictly endurance sport but a really good insight into the specific preparation of an elite athlete
------------

Training Strategy for Evander Holyfield
The time-honoured -- but unfortunately ill-conceived -- practice of long, slow distance work as a conditioning regimen for boxers is what Evander learned from the training dinosaurs of his youth, and had continued with for years. When I was brought aboard his team, prior to his fight against Buster Douglas in 1990, Evander was in sad physical condition considering the specific demands of his sport. I immediately tested Evander's responses to three minutes of boxing specific total body work (see the 3-minute drill description below), which brought his heart rate above 180 bpm. He needed a full 7 or 8 minutes to recover back to 120 bpm after this single bout, analogous to one hard boxing round. What was worse, after doing five of the 3-minute drills with a one minute rest between, his heart rate remained above 150 between bouts. In short, he did not have the capacity to sustain a high performance level for even half of the duration of a professional fight.


My responsibilities were limited to the physical conditioning component of Evander's training, which had to be integrated into his skills and sparring training. Boxers require not only agility, speed and strength in short, explosive bursts, but also a high level of anaerobic strength endurance in order to perform these bursts over and over for ten rounds or more. I designed Evander's training regimen and nutritional protocol to reflect these all-important elements. The road work ended promptly and completely.


After the 12 week cycle described below, Evander recovered quickly from intense activity, even after a series of ten, 3-minute drills. His agility and limit strength levels increased, and his lean Baudot increased from 208 to 218.


The conditioning program described below was the program I personally supervised Evander through prior to the Buster Douglas fight. He also used the same training cycle in preparation for his most recent fights against Mike Tyson, but I was not there personally to oversee his training. This preparation was supervised by a friend of mine in the strength coaching profession who assures me the Evander followed the prescribed program precisely.


General Points of Conditioning for Boxers


There are several general concepts which helped to shape the specific program that I designed for Evander. First, the work profile of boxing is repeated 3-minute rounds of activity, often with very high intensity bursts within a round. The rounds are separated by one minute rest intervals. Thus, the relative contribution of anaerobic energy release pathways is considered extremely important, with aerobic capacity playing an important role in terms of facilitating rapid recovery. Extreme conditioning is required to fight effectively for ten intense, 3-minute rounds and anaerobic endurance is a key aspect that cannot be overlooked. Short of an early round knockout, boxers cannot afford to win only the early rounds of a fight. They must maintain an intense, but measured pace throughout a long and competitive bout. So conditioning counts almost as much as skill for boxing success. Optimal physical conditioning provides the platform from which the skills can be used. The best way to simulate the demands of boxing is to use conditioning methods which mimic the work/rest ratio and integrated bursts of power that typify boxing.


Boxing is a highly individual sport. Fighters possess unique styles that create specific physical demands. Some rely on explosive strength ("power"), for others it's starting strength ("speed"), and for most a combination of the two ("speed-strength"). True champions alter their style in a way that will make them more able to attack the weaknesses of any given opponent.


Improvements in specific capacities can be made, but they are only helpful if integrated into the fighter's style. For example, extensive footwork exercises may not benefit the power puncher who fights stationary and looks to deliver a blow that starts with the legs and drives right through the opponent (and wins that way). Similarly, a fighter who relies on punching speed and fast footwork should not put all his training hours into heavy bag work and muscle mass development. So, the program designed must not only be specific to boxing, but also specific to the boxer.


Ideally, the boxing punch consists of a synchronization between arm, leg, and trunk actions. The punching movement of a boxer consists of leg extension, trunk rotation, and arm extension, in succession. The more effective the coordination between arm, leg and trunk movements, the greater the impact force of a punch. The leg muscles play a vital role in the power developed in this sequence. Increasing leg force development and coordinating it with trunk and arm action is probably the most effective way to increase punching power.


Because boxing is an explosive sport, ballistic training methods are especially effective during weight training for boxing. This kind of training method requires the athlete to perform each repetition explosively, with maximal intended velocity. Finally, in my view, the best way to weight train for competitive boxing is via a cycled training schedule. This type of training schedule integrates workouts and exercises that will meet all the basic performance demands of boxing, strength, power, speed, agility, and strength endurance.


Evander's Conditioning Plan

The twelve week macro cycle was broken down into four mesocycles of three weeks duration. Each 3-week period had specific goals, and each subsequent 3-week period built upon what was established in the preceding periods. The conditioning goals for each mesocycle were as follows:


Weeks One, Two and Three


1. Maximize muscle mass -- Evander needed to increase his body mass from under 210 to 220 pounds.

2. Minimize fat accumulation during hypertrophy phase (dietary strategies including "zig-zag" diet were employed).

3. Improve general strength and fitness foundation, including moderate aerobic threshold intensity training.

4. Begin training to increase anaerobic threshold.

5. Introduce light plyometrics.


Weeks Four, Five and Six

1. Maximize limit strength of muscles/movement used in boxing (emphasis on legs).

2. Increase anaerobic strength endurance (maximum force output time after time).

3. Begin training specific skills (weaknesses) in earnest.

4. Concentrate on between-workout recovery.

5. Introduce explosive strength and starting strength with moderate plyometrics.


Weeks Seven, Eight and Nine

1. Maximize explosive strength.

2. Specific event skills must predominate all skills training sessions.
3. Continue anaerobic threshold training.

4. Maximize between-workout recovery.

5. Incorporate weighted plyometrics and hill/stairs running.


Weeks Ten, Eleven and Twelve

1. Maximize ballistic strength (starting strength) using "shock" plyometrics (built on a 9-week base of plyometrics progression).

2. Heavy emphasis on anaerobic threshold.

3. Maximize between-workout recovery ability.

4. Heavy emphasis on skills.

5. Emphasize speed, agility, ballistic movements.

6. "Overspend" drills in final preparatory period.

7. Begin "complex training" (description below) as a replacement for normal weight training.


Evander's Training Techniques and Sequences

(abbreviated terms are described after the table)


Explanation of Training Terms and Details


Boxing Skills & Sparring: Evander's personal boxing skills regimen is up to him and his coach. However, Evander's coach and I communicated to establish precisely what physical and mental capabilities this form of periodized conditioning would provide Evander. In this way, Evander's boxing skills were in perfect sync with his fight strategy and his conditioning efforts right up to the fight. Use of the heavy bag early in the 12 week macro cycle was carefully monitored due to the severe ballistic nature of this training medium.

IE Impulse/Inertial Machine: This machine is used to develop starting strength in jabs, uppercuts, hooks. It is tough and requires total body coordination. Evander's problem was that he did not use good total body coordinations in his punches. He tended to be an "arm-puncher." This training apparatus was employed to help Evander develop this motor sequence and use his legs more when punching.

UBE Cybex Upper Body Exerciser (upper body exercycle)

VersaBall: This is a more comfortable variation of the old medicine ball. Upper body plyometrics teaches explosive and starting strength in all punches and requires total body coordination. VersaBall throws were made from the following positions.
-right and left jab positions (single arm)
-between legs (double arm, for back)
-overhead (double arm, for midsection)
-chest pass (double arm)

Weight Training: Initially (during mesocycle one), Evander followed a modified bodybuilding and basic strengthening program using a "variable split" format. A, B and C specify whether the workout is to be a very easy one (A), a moderately difficult one (B), or a high intensity one (C). This part of Evander's program was monitored by Lee Haney, multiple "Mr. Olympia" bodybuilding champion, and a former student of mine.Evander's Variable Split Exercise Listing
The precise schedule of when to do an A, B or C workout was matched to Evander's recuperative abilities.

In mesocycle two, Evander switched to a sports-specific weight training program.In mesocycle three Evander switched to "complex training." This form of training targets limit strength, explosive strength and starting strength/amortization in one "set" of exercises. The exercises are performed back to back and include jumps, bar exercises, and depth jumps--in that order. The function of the complex method is to peak the athlete. My experience has been that it is a better peaking program than simple bar exercises or plyometric exercises alone.

3-Minute Drill: 3-minutes of combinations of forward and backward sprints, skipping, hopping, jumping and "carioca" (football) drills for both upper and lower body.Start out with only three, 3-minute drills with one minute rest between each gradually (over the first mesocycle) work up to six 3-minute drills with one minute rest between Take pulse after each drill (target: 180 bpm), and again after one minute rest (target: 110 bpm). Below are the instructions given to the trainer responsible for monitoring Evander's 3-minute drill training and plyometrics sequences.Bear in mind that this drill is NONSTOP -- pushing him to the absolute limits of his anaerobic tolerance. Keep pounding it into him "CHECKMARK! CHECKMARK!" on all of his movements, including every step he takes, every jump, hop, skip and start/stop. "Checkmark" is a phrase known to all of the athletes I work with. It reminds them to keep the amortization phase (transition from down to up or backward to forward) of each movement pinpoint sharp, the way a "checkmark" looks.The 3-Minute Drill Sequence:
-Jog or step-ups to warm up, then
-sprint 40 yards
-stop and sprint backwards
-jump in place high ten times
-get in a pushup position and give me your legs
-run forward on your hands
-run backward on your hands
-run left
-run right
-jump up and down on your hands 10 times
-stop... get up... carioca left 40 yards
-carioca right back to me
-skip 40 yards
-skip backwards back to me

Each 3-minute drill is performed on verbal commands from the trainer. Evander must go for a solid 3 minutes at a heart rate of 180 beats per minute (minimum). After a one minute rest (getting his heart rate back to 110-120) repeat, rest, and repeat again.

Notice that jumps, hops and skips should be performed with "checkmark" intensity, as should every single move Evander makes -- POUND that thought into his head every minute of these drills. Always tape Evander's wrists and wear gloves (protection from debris and potholes)!Plyometrics This is a way of improving starting strength, explosive strength and amortization (the "checkmark") through total concentrated force output in every move Evander makes. On days where the midday workout is limited to plyometrics, they should be relaxed, with much rest between bouts, with each bout only lasting 10-20 seconds.

The Plyometrics Sequence
1. jog or do stepups to warm up
2. easy (not "all-out") jumps, hops, skips, and then
3. do 20 yards of skips
4. again
5. hops like a kangaroo
6. again
7. repeat 3, 4, 5, and 6 backwards
8. one-legged hops 30 yards (both feet)
9. hops on hands 10 yards
10. repeat 9 backwards
11. repeat 9 left and right

In second mesocycle, do all of the above with a weighted vest.In third mesocycle, incorporate bench hops, 10 reps.In third mesocycle, incorporate twisting skips 40 yards, and twisting the other way back 40 yards.